
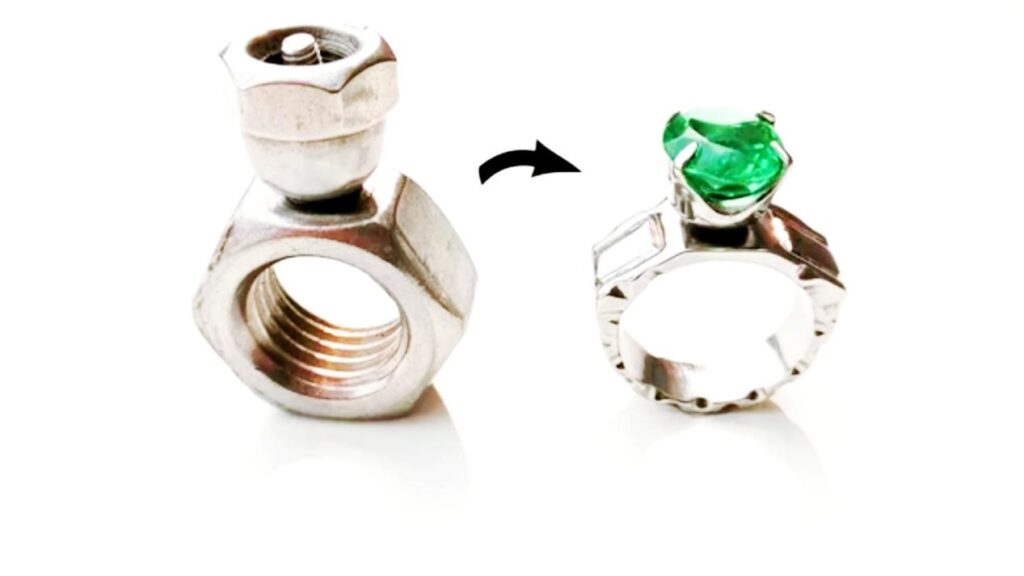
If you have the nuts and bolts then you can put them together with an emerald gemstone to make a beautiful emerald gemstone ring! Read on with me right now if you’re interested!
1. Prepare the materials and tools you need
As a matter of fact, there are not many materials that you need to prepare, including only four things. They are hex nuts, dome nuts, hex bolts, and emerald stones of the right size. In order to ensure that this ring will not develop rust spots later on, you’d better choose stainless steel screw fittings for all of them.
Here you may need to have some of the more specialized tools on hand. These include drills, rotary tools, angle grinders, jeweler’s hand pliers, drum sanders of different sizes, polishing chemicals, and needle file sets. Of course, not all of the tools mentioned above are necessary, and you can certainly choose the ones you like or the ones you are comfortable with if you can accomplish your goals just as well with other tools.
2. Handling the inner circumference of the nut
The first thing you need to do to create a ring is to measure the size you need and then choose the nut that is about the same size. The purpose of this is to reduce the time wasted on resizing the ring. Once we have chosen the right nut, we can begin our operation. The first step is to use a spray gun to heat the nut and adjust it to the right size and dimension for you after the nut has been annealed. Don’t worry, you probably won’t be able to size the ring in one go, we’ll need to polish the ring later. The next thing you need to do is to use a file to keep sanding the ring and try to adjust the nut to a smooth and rounded look. Of course, during this process, you have to take the ring to your hand from time to time to try it on and finally adjust it to the right size for you.
3. Shape the peripheral dimensions of the nut
Once we have the inner dimensions of the ring decided, we can start adjusting the outer perimeter of the ring. If you’re trying to make a ring that is in the shape of a circle. You can then use a file or a sander to smooth out the tip of the outside of the nut. Once you have finished sanding the peripheral shape of the ring, all you need to do is to leave a flatter surface for the area where you want to set the gemstone, so that you can subsequently glue on the base with the gemstone set in it. However, here you also need to consider the size of the setting you have set aside, too large and too small is not appropriate.
4. Creating a gem-set base
Once we have finished making the ring ring, we can come to the gemstone part. Here you can choose the hexagonal bolt we mentioned above to be used as the base for the emerald gemstone setting after it has been sanded and engraved. You can use a drill to deepen the hole that comes with the bolt and then grind the lower part of the bolt shorter. If you want to go for a more intricate gemstone setting, you can also have the top half of the bolt machined in any style you want. For example, a four-prong, or an eight-prong. Of course, it’s also possible if you want to carve some distinctive details, or patterns on the base of the gemstone setting, it’s all up to you. What you need to take care of here, though, is that you need to secure the carved parts to prevent them from accidentally slipping off during the carving process.
5. Choose a gemstone you like
As a matter of fact, if you don’t like emerald gemstones, you can always choose some other gemstones, as long as you like them, other gemstones are of course a better choice. If you want to pick a good quality gemstone, you may need to spend some time and effort. If conditions permit, you can even use stereo microscopes to observe more details of your chosen gemstone, such as whether there are cracks, bubbles in it and so on.
6. Burnish
By now, most of the work has been done. You can now turn on the next step. Before polishing, you need to clean the metal debris from the part to be polished to prevent it from affecting the polishing later, such as leaving unwanted scratches and dents. Then, you can get out your polishing machine to polish the ring. During this process, you may need to replace the sanding tips with different sizes and dimensions. By the way, don’t forget to use the polishing compound mentioned above. It will give the polished ring a glossy finish. Also, if you look closely at the instructions of different polishing compounds, you will realize that they all work differently. That’s why it’s common for you to use several different polishing compounds during a single polishing session.
5 Creative Ideas Insurance Agents Can Use To Build A Customer Base(Opens in a new browser tab)
7. Final assembly
Once you have completed the above steps. Congratulations, you can finally assemble your ring. Take out all the parts you got before this, including the ring, the gemstone base and the gemstones you carefully selected. You may need to use pliers for the purpose of setting the gemstone on the gemstone base. Then all you have to do is to solder the gemstone base with the gemstones set in it to the previously polished finger ring. In this way, you’ve got a beautiful emerald gemstone ring.
Above all, this is the whole process of making an emerald gemstone ring. If you happen to have these materials and tools mentioned above, then you are ready to act quickly. Looking forward to seeing your creations!